Required Movies/Exercises plus Movies/Exercises for those who wish a more indepth understanding.
![]()
![]()
Required movies and excercises are linked in the text below.
Anatomy of the Physical Exam
![]()
Recall your introductory embryology lectures from "Genes and Development". The organization of the body is basically a "tube" within a "tube" with a space between them. The outer "tube" can be thought of as the outer wall of the body, while the inner "tube" is the digestive track and lungs. Obviously the outer wall separates the inside of the body from the outside world, but this is also true of the inner tube. A long enough probe that was inserted into the mouth would emerge through the rectal pore without puncturing any tissues. (Don’t try this on yourself!) Many of the internal organs are diverticula, or branches of this tube, that occupy the space between the inner and outer tubes. The inner tube and its diverticula are known as viscera. The word visceral refers to these structures. The organization of the viscera and their nerves and vessels is very different from that of the outer body wall and will be considered later. For today, we are only concerned with some of the viscera and its surface projections, i.e., the surface feature to which each viscus is related. (In anatomical lingo, “related” means “lies next to”.)
Essential Questions:
• How does the anatomy of the body wall guide our examination of the patient?
Learning Objectives:
• Relate embryonic pattern formation to segmentation of the adult body wall.
• List features of the skeleton that illustrate segmentation and indicate how nerves and vessels follow the pattern of the skeleton?
• Use palpable features of the skeleton as landmarks to find other structures. List skeletal features that can be used as radiographic landmarks?
• Identify features of the vascular system that are palpable or can be auscultated. Relate auscultatable features to palpable, skeletal features.
• List organs can be examined without puncturing or incising the skin and relate them to palpable features of the body wall.
• Explain today's procedures to 1) a child who is your patient, 2) someone with only a high school diploma, 3) a college diploma, 4) a professional degree in a non-medical discipline, and 5) a clinical colleague.
What you are actually doing in today's lab is learning about the skeleton in relation to certain organs. The rest of the course builds on this very basic knowledge. The anatomy you learn today is remembered by all clinicians, regardless of their specialty.
There is a VH Dissector Pro lesson plan that is keyed to this lab. Ask your instructor for help in running this computer software in the dissection lab.
This web activity Body Painting will help you understand what you are doing.
You might also like to consult this educaster movie
You will also need your text, an atlas and an articulated skeleton. The goal of this activity is to relate diagrams and artists' renderings to the plain films (X-rays) and the things you can feel when you touch the body wall.
Let's start by locating some midline landmarks. In some cases, it may be easier to find these things on yourself or on a willing lab partner. Then you can approximate the position on your donor. Use a black marker or paint to draw the following onto your donor:
Insert
your finger gently into the suprasternal notch at the upper end of the
sternum.
Which bones lie lateral and inferior to your finger?
Look at a skeleton and AP plain films:
If you need help with plain films, go to
What vertebral level corresponds
to the notch? Why is it lower than T1?
Draw a U over the position of the suprasternal notch.
From the notch, slide your fingers down the manubrium (~5cm) until it encounters a transverse ridge. This is the sternal angle of Louis.
Which
rib articulates here?
What vertebral level corresponds to the sternal angle? Why?
Draw a line the width of the sternum to indicate the position of the sternal angle of Louis.
Slide your finger to the bottom of the sternum, and palpate the xiphisternal joint. The xiphoid process often points inward and maybe hard to palpate.
Draw an ellipse about the xiphoid process.
The costal margin is the inferior border of the rib cage.
The costal cartilages of which ribs contribute to it?
Draw a line along the costal margin from the xiphoid to the midaxillary line (the axilla is the arm pit).
Palpate the pubic bone on either side of the pubic symphysis. This is the bony structure just superior to the genitalia. Draw a line along its superior border from pubic tubercle to pubic tubercle. View it on an AP lumbar plain film and a skeleton (Radiology Resource: Abdomen & Pelvis X-Ray).

Abdominal Landmarks: 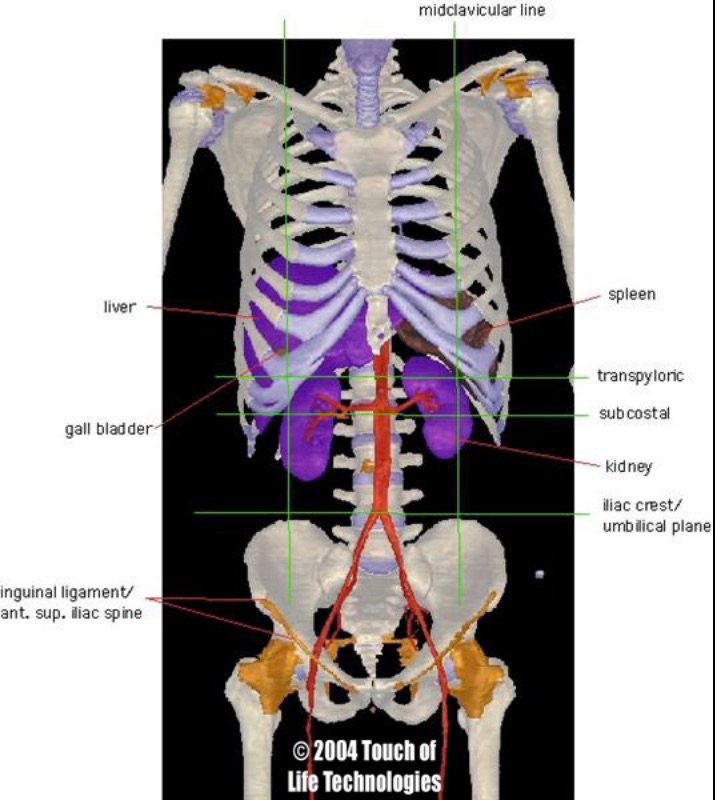
For an individual standing upright, axial planes cut horizontally through the body parallel to the floor.
Use bony landmarks to locate the axial planes listed below and draw them as dashed lines with black paint or a marker.
This axial plane lies half-way between the suprasternal notch and the pubic symphysis.
On a fit and trim individual this plane also lies half-way between the xiphoid process and the umbilicus. How about on your donor? On VH Pro or in an atlas, look for the constriction (pylorus) between the stomach and the duodenum (the first segment of the intestines). Look for the 12th rib and then find L1, which is the level of the pylorus.
Palpate and use a solid line to draw the iliac crests from anterior spine as far posteriorly as you can. Note how close the crest comes to the costal margin. Draw a dashed line between the most superior aspects of the crest and note that it crosses near the umbilicus of a thin individual.
Together with the midline, the transumbilical plane is used by clinicians to divide the abdomen into quadrants. On the back, a line that connects the superior-most aspect of each iliac crest crosses the L4/L5 disc, where spinal tap and epidural anesthesia procedures are performed. Locate this plane on a plain film of the abdomen.
An important ligament, the inguinal ligament of Poupart, lies between the anterior superior spine and the pubis. Draw this with a solid line.
Which body compartment lies superior to, and which compartment lies inferior
to, the ligament?
Draw a lighter dashed line between superior, anterior iliac spines of the left and right sides. It crosses the vertebral column slightly below L5.
Draw a dashed line between the inferior-most aspects of the costal margins.
A midsagittal plane divides the body into left and right halves. Clinically, the midsagittal plane is the most important sagittal plane. For clarity, we will not draw it, but you will use it as a reference for this lab and the rest of your career. The terms right and left always refers to the patient's (or your donor's) right or left. (This is easy to forget when you are looking at an imaging study or pointing something out on your donor.) A parasagittal plane parallels the midsagittal plane.
An important parasagittal plane is the mid-clavicular line. Draw a dashed line inferiorly from the mid point of each clavicle. The line should cross the nipples.
The nipples overlie which rib or intercostal space? Hint: use your previous observation that the second costal cartilage articulates with the angle of Louis and count down from there (this will probably be easier to do on yourself than on your donor). This will vary for women with pendulous breasts.
A midaxillary (middle of the armpit) plane divides the body into anterior and posterior halves. Clinicians commonly refer to the anterior and posterior axillary lines, which cross the anterior or posterior border of the armpits.

If you need help with plain films, go to
The respiratory diaphragm is a dome, so it does not lie in
a single plane. The diaphragm separates the trunk of the body into two
main compartments: the thorax, superiorly and the abdomen inferiorly. The dome has two peaks: the right peak is generally
more superior than
the left peak. (See the Radiology resource for a common exception,
and why it occurs.)
Why is the right side generally higher?
Use a solid line to draw the diaphragm as it appears in a mid-axillary coronal plane during shallow inspiration. The two domes meet at the xiphisternal junction and peak at the mid-clavicular line. On the right side it peaks just below the nipple (5th rib - count ribs from the Sternal angle of Louis). On the left it peaks 2-3 cm below the nipple (5th intercostal space). (The ribs are better landmarks for older women with pendulous breasts.) The diaphragm meets the costal margin at the mid-axillary line.
(Why does the diaphragm move with each breath in proportion to the
depth of the breath?)
(Keep referring to Body Painting and the Abdominal Landmarks image above.)
On the right side, paint a small green circle above the costal margin where it is crossed by the transpyloric plane. (Note this is near the intersection of the mid-clavicular line and the costal margin.) This circle represents the fundus of the gallbladder.
The gallbladder is palpable by digging your fingers into the abdomen and up under the rib cage. (Not fun, I don't advise it!)
On the right side paint in red the space between the diaphragm and costal margin. On the left side, draw a line from the peak of the left dome of the diaphragm to the intersection of the costal margin and the right mid-clavicular line. Color in the region between this line and the diaphragm. (Don't obscure any lines you have already drawn.)
An enlarged liver would be palpable inferior to your drawing. Why? Because the diaphragm prevents the liver from growing in any other direction.
The spleen is not palpable unless it is enlarged. The tip of a very large spleen can be palpated (or percussed) in the 8th or 9th intercostal spaces intercostal spaces. Find this location by using the the transpyloric plane or the axial plane where the left mid-clavicular line cross the costal margin. These planes are very close, and practically speaking, you will tend to use the mid-clavicular line method.
Follow the transpyloric plane laterally until you cross the anterior axillary line. This line parallels the mid-clavicular line and extends from the anterior side of the axilla (arm pit). Draw a red dot to indicate this location.
First, locate and draw the abdominal aorta: The descending aorta crosses the diaphragm at T12. On the abdominal aorta angiogram, look for rib 12 and the first major branches of the aorta.
Infer the position of T12 from the xiphisternal junction (T9/10disc) and the transpyloric plane (L1/L2 disc). Beginning from T12, paint in red a 2 cm wide line inferiorly, and just to the left of the midline. The line should end at L4 (just below the umbilicus), just superior to the line connecting the iliac crests (L4/5 disc).
In a thin individual who is completely relaxed, the pulsating abdominal aorta may be palpated.
Second, draw the common iliac arteries: At L4 the aorta bifurcates, to form the left and right common iliacs. After giving off the internal iliac, they continue as the external iliac and then common femoral arteries. Find the midpoint of the inguinal ligament of Poupart that you drew earlier. The artery passes a little medial to the point. You may use VH Dissector Pro to visualize this, or better, palpate your own femoral pulse (it may be hard to feel through your clothes, use discretion!). Using red paint, connect this point (medial to the midpoint of the inguinal ligament) to the aorta at L4. Continue the artery 2-3 cm down the leg. The inguinal ligament marks the beginning of the femoral artery.
The bifurcation of the abdomenal aorta is a place to listen for iliac bruits (see the following question.).
Third, draw left and right renal arteries to the region of the kidney hilum and then compare your drawing to the real deal (Graphics resource: “Abdominal Landmarks”): The renal arteries branch off the aorta near the subcostal plane (L2).
What is a bruit?
Write an "M" 1/3rd the distance from the right anterior iliac spine to the navel (umbilicus).
The vermiform appendix lies beneath this point.
The junction of which two segments of the gastrointestinal tract
is also found here?

You might also like to consult this radiology web activity
You might also like to consult this educaster movie
Palpate the hyoid bone at the junction of the neck and the floor of the mouth. Slide it from side to side. Draw a black line to indicate its position.
Palpate your hyoid bone and swallow.
What function is served by the hyoid being pulled superiorly during swallowing?
Look for the hyoid on a lateral plain film of the neck.
Palpate the thyroid cartilage (Adam's apple) just below the hyoid bone. Inferior to the thyroid cartilage palpate the cricoid cartilage, the first cartilaginous ring of the trachea. Outline the trachea in blue down to the jugular notch. Draw horizontal lines in the fashion of a ladder to indicate the cartilaginous rings of the trachea.
Gently palpate these rings as you swallow.
What happens to the trachea when you swallow? Why?
The common carotid artery bifurcates in the neck as it travels superiorly. This is an area of turbulence where an atherosclerotic plaque can develop. A large plaque would make the turbulence audible.
On yourself, palpate the lateral horn of the hyoid bone and the superiolateral aspect of the thyroid cartilage. From here push the sternocleidomastoid muscle laterally and feel for a pulse. Find the bifurcation on a carotid angiogram or in the Graphics resource (neck landmarks). Locate the analogous position on your donor and mark it CB (carotid bruit).
Palpating an enlarged thyroid gland
The thyroid gland lies on either side of the trachea. The two sides are joined by an isthmus that crosses superficial to the trachea just below the cricoid process. The isthmus is not normally palpable, because it is small. The main portions of the gland are not normally palpable either, because they lie behind several muscle layers.
Approximate the location of the thyroid gland and paint it green.
With brown paint, draw the outline of the heart, as follows. Feel and mark the apex of the heart in the 5th or 6th intercostal space just medial to the mid-clavicular line. Draw the left margin of the heart from this point to the 3rd costal cartilage, 1 cm to the left of the sternum. Draw the inferior border from the apex of the heart across the xiphisternal junction to 1 cm beyond the right margin of the sternum. From this point draw a line superiorly parallel to the right margin of the sternum to the 3rd costal cartilage. Connect the ends of the superior border. The size of the heart should be about the size of the donor's fist.
Compare your drawing with an AP chest film and correct your drawing accordingly.
Using red paint, begin the arch of the aorta at the superior border of the heart. Start it between the midline and the right margin of the sternum. Swing it to the right so that the right border is 0.5 cm to the right of the sternum and then swing it back to the left so that it arches thru the middle of the manubrium. End it just to the left of the manubrium without drawing the descending portion.
Locate right and left borders of the arch of the aorta on an AP chest film.
The trachea bifurcates at the sternal angle. In blue, continue your drawing of the trachea below the arch of the aorta, where it immediately splits into two main bronchi that course obliquely downward to the right and left. The right branch continues behind the ascending aorta for a total length of 2.5 cm before branching into 3 secondary bronchi. The left branch continues for 5 cm before branching into 2 secondary bronchi.
Explain the reason for the different number of secondary bronchi in the left and right lungs. Locate the bifurcation of the trachea on a chest film and a bronchiogram.
Beginning at the superior border of the heart, draw in brown a short pulmonary trunk to the donor's left of the ascending aorta. Draw left and right branches that parallel the left and right main bronchi.

With a black marker, draw an oblique line over the heart that extends from the left 3rd costosternal joint to the right of midline, just above the xiphisternal junction. Draw 4 circles along this line and label them from patients right to left, tricuspid, mitral, aortic and pulmonary.
This marks the location of the valves, but not their auscultation points.
Why would it be difficult to hear individual valves by listening directly over each valve?
The blood coursing through the valves carries the sound of the valve with it.
Use the symbol of a speaker to indicate the auscultation points: aortic valve - 2nd intercostal space to the right of the manubrium, pulmonary valve - 2nd intercostal space to the left of the manubrium, tricuspid valve - just to the left of the xiphoid process, mitral valve - the apex of the heart.
Extra credit: for each valve, relate the chamber of the heart in which the blood originates to the vessel or chamber it enters after passing through the valve.
Use a dashed blue line to indicate the position of the pleural reflections (where the pleural lining reflects off the body wall on to the mediastinum or the diaphragm). These are the reflections along the anterior wall. They are different from the posterior wall. (This fact is clinically important and will be explored in later labs.) Begin at each sternoclavicular joint to the midline at the sternal angle. Extend the right line inferiorly to the 6th costal cartilage and then to the right to the 8th rib at the mid-clavicular line. Continue to the 10th rib at the mid-axillary line. Extend the left line inferiorly to the 4th costal cartilage. Before continuing inferiorly, move the line laterally to the left border of the sternum. Now extend the line inferiorly along the left sternal border to the 6th costal cartilage. Continue as on the right side.
Why are the pleural reflections that you just drew inferior to your drawing of the dome of the diaphragm?
Use a solid blue line to outline the lungs. Draw the apex of the lung above the clavicles. Along the midline, you would follow the lines of pleural reflection, but for clarity don't cover up the ascending aorta or right border of the heart. Do the same on the left side, but appreciate that below the 4th rib, the lung does not completely cover the heart. Draw the inferior borders of the lungs two rib levels above the pleural reflections.
The lines of pleural reflection indicate a space that is larger than
is needed to accommodate the lungs during shallow breathing. Why?
By now you should have encountered the following Key Words in the clinical context that you need to know them. In time, you will encounter them in additional contexts and expand your definitions of them.
Rather than merely defining these terms (which we don't test directly), try to reorganize the list into relational groups (which we do test), e.g., nearest neighbors, structures that function together, structures that are connected, surface projections, etc. -- Relate the Key Words to the learning objectives.
| Spatial references: | ||
| Anterior | axial (transverse) plane | coronal plane |
| inferior | mid-clavicular line | midline |
| parasagittal plane | posterior | sagittal plane |
| subcostal plane | superior | transpyloric plane |
| transumbilical plane | ||
| Palpable bony landmarks: | ||
| angle of Louis (sternal angle) | anterior superior iliac spines | costal margin |
| hyoid bone | iliac crests | pubic symphysis |
| rib 2 | suprasternal (jugular) notch | xiphisternal joint |
| Neck: | ||
| carotid artery | carotid bifurcation | carotid bruit |
| cricoid cartilage | larynx | thyroid cartilage |
| thyroid gland | trachea | |
| Thorax: | ||
| arch of the aorta | ascending aorta | cardiac valves |
| clavicle | costal cartilage | descending aorta |
| diaphragm | heart | inspiration |
| lungs | manubrium | pleural cavity |
| pulmonary artery | rib | sternum |
| xiphoid process | vacuum | |
| Abdomen: | ||
| abdominal aorta | anterior compartment of the thigh | ascending colon |
| caecum | colon | gall bladder |
| ileum | inguinal (Poupart’s) ligament | large intestine |
| liver | McBurney’s point | Peritoneal cavity |
| renal artery | renal bruit | small intestine |
| spleen | ||
| Vertebral landmarks: | ||
| T2, T3, T5, T10, T12, L1, L2, L4 | ||
©2015 Yale School of Medicine